HomebrewでTklibをインストール
↑ではTklibをHomebrewで入れたTcl/Tkのディレクトリに直接インストールしていましたが、HomebrewのFormulaを作ってインストールした方がいいです。
以下のFormulaでbrew installすればPlotchartが使えるようになります。
class Tklib < Formula
  desc "A collection of utility modules for Tk, and a companion to Tcllib"
  homepage "http://www.tcl.tk/software/tklib/"
  url "https://core.tcl-lang.org/tklib/attachdownload/tklib-0.7.tar.bz2?page=Downloads&file=tklib-0.7.tar.bz2"
  version "0.7"
  sha256 "5a1283a1056350c7cb89fba4af1e83ed2dbfc2e310c5303013faae0b563e5ece"
  license "TCL"

  depends_on "tcl-tk"

  def install
    system "./configure", "--prefix=#{prefix}",
                          "--with-tclsh=#{Formula["tcl-tk"].opt_bin}/tclsh"
    system "make", "install-libraries"
  end
end
以上です。
M1 MacでDocker Desktopに頼らずにx86_64のlRubyを使うまで(追記2)(未解決)→(解決)
はじめに
M1 Macで、limaを使ってx86_64のIRubyを使ためにいろいろやりましたが、この前のように、
$ docker build --platform linux/amd64 -t iruby .
とすると
/bin/bash: pipefail: No such file or directory
と出てbuildに失敗するようになりました。どうしたものかと調べていると、そもそもlima公式に「Fast mode: Intel containers on ARM VM on ARM Host / ARM containers on Intel VM on Intel Host」という記載がありました。
セットアップ
ここに記載されているとおりにやるだけ。
$ limactl start
$ lima sudo systemctl start containerd
$ lima sudo nerdctl run --privileged --rm tonistiigi/binfmt --install all
以下のようなDockerfileを用意。
(IRubyにcztopは不要になったみたいですね。)
FROM jupyter/base-notebook:latest
USER root
RUN apt-get update \
  && apt-get install --no-install-recommends -y \
  libczmq-dev \
  libtool \
  make \
  ruby-dev \
  && apt-get clean \
  && rm -rf /var/lib/apt/lists/*
RUN gem install --no-document \
  iruby
USER $NB_USER
RUN iruby register --force
Dockerfileを置いたディレクトリで以下を実行。
$ nerdctl.lima build --platform linux/amd64 -t iruby .
無事完了したら、以下のコマンドでIRubyを起動。
$ mkdir /tmp/lima
$ nerdctl.lima run --platform linux/amd64 -it --rm -p 8888:8888 -e JUPYTER_ENABLE_LAB=yes -v /tmp/lima:/home/jovyan/work iruby
これでオーケーと思ったのですが、以下のメッセージを出力してIRubyが終了してしまいます。
Writing notebook-signing key to /home/jovyan/.local/share/jupyter/notebook_secret
Operation not permitted (src/thread.cpp:309)
build時とrun時に--platformを付けないで(linux/arm64で)動作させると、落ちないんですが…
おわりに
結局、未解決。
ここにあるように、Docker Desktop for macでも同様の現象が起きているようです。
追記
これっぽい。
解決
ここによると「For now, simply using old version (tonistiigi/binfmt:qemu-v6.0.0-12) can resolve the jupyter crash」とのことなので
$ limactl start
$ lima sudo systemctl start containerd
$ lima sudo nerdctl run --privileged --rm tonistiigi/binfmt:qemu-v6.0.0-12 --install all
とすると、大丈夫でした!
M1 MacでDocker Desktopに頼らずにx86_64のlRubyを使うまで(追記)
はじめに
前回、limaでM1 MacでDocker Desktopに頼らずにx86_64のIRubyを使うまでを記載しましたが、こちらで紹介されているとおりにlima + Docker CLIにした上で、--platform linux/amd64で buildした方がいい感じ。
構築
こちらで説明されているとおりに環境を構築します。ただしパッチを当てたQEMUのインストールは今は不要だと思います。
あとは、前回同様以下のようなDockerfileを用意。
FROM jupyter/base-notebook:latest
USER root
RUN apt-get update \
  && apt-get install --no-install-recommends -y \
  libczmq-dev \
  libtool \
  make \
  ruby-dev \
  && apt-get clean \
  && rm -rf /var/lib/apt/lists/*
RUN gem install --no-document \
  cztop \
  iruby
USER $NB_USER
RUN iruby register --force
Dockerfileを置いたディレクトリで以下を実行。
$ docker build --platform linux/amd64 -t iruby .
無事完了したら、以下のコマンドでIRubyを起動。
$ mkdir /tmp/lima
$ docker run -it --rm -p 8888:8888 -e JUPYTER_ENABLE_LAB=yes -v /tmp/lima:/home/jovyan/work iruby
表示されるhttp://127.0.0.1:8888/lab?token=…にブラウザでアクセスすると、x86_64のlRubyが使えました。
おわりに
aarch64では使えないneilslater/convolverも動きました。

すばらしい。
M1 MacでDocker Desktopに頼らずにx86_64のlRubyを使うまで
はじめに
Docker Desktopと同様に、limaでも、M1 Macでx86_64のIRubyが動作します。以下、その手順です。
limaを使えるようにする
前回の記事のqemu-virglをインストールするところまで実施します。
x86_64のlimaを起動
$ limactl start amd64
amd64の部分は何でもよいです。
以下のように表示されるので、矢印キーでOpen an editor to override the configurationを選択してreturn。
? Creating an instance "amd64"  [Use arrows to move, type to filter]
  Proceed with the default configuration
> Open an editor to override the configuration
  Exit
エディタが起動するので、以下のように書き換えて保存し終了。
@@ -4,7 +4,7 @@

 # Arch: "default", "x86_64", "aarch64".
 # "default" corresponds to the host architecture.
-arch: "default"
+arch: "x86_64"

 # An image must support systemd and cloud-init.
 # Ubuntu and Fedora are known to work.
@@ -49,7 +49,7 @@
   # A localhost port of the host. Forwarded to port 22 of the guest.
   # Currently, this port number has to be specified manually.
   # Default: none
-  localPort: 60022
+  localPort: 61022
   # Load ~/.ssh/*.pub in addition to $LIMA_HOME/_config/user.pub .
   # This option is useful when you want to use other SSH-based
   # applications such as rsync with the Lima instance.
x86_64のLinuxイメージのダウンロードと環境構築が始まります。結構時間がかかります。
IRubyの構築と起動
以下のようなDockerfileを用意。
FROM jupyter/base-notebook:latest
USER root
RUN apt-get update \
  && apt-get install --no-install-recommends -y \
  libczmq-dev \
  libtool \
  make \
  ruby-dev \
  && apt-get clean \
  && rm -rf /var/lib/apt/lists/*
RUN gem install --no-document \
  cztop \
  iruby
USER $NB_USER
RUN iruby register --force
Dockerfileを置いたディレクトリで以下を実行。
$ limactl shell amd64 nerdctl build -t iruby .
とても時間がかかります。私の環境では30分以上かかりました。コーヒーを飲みながら待ちます☕
無事完了したら、以下のコマンドでIRubyを起動。
$ mkdir /tmp/lima
$ limactl shell amd64 nerdctl run -it --rm -p 8888:8888 -e JUPYTER_ENABLE_LAB=yes -v /tmp/lima:/home/jovyan/work iruby
ブラウザでアクセス
表示されるhttp://127.0.0.1:8888/lab?token=…にブラウザでアクセス

すばらしい。
おわりに
なぜこんなことをしているかというと、手元のIRuby notebookで使っている neilslater/convolverがaarch64では使えないから。
icm7216/narray-convolveを使えばいいのでは? まぁ、そうですね…
MacBook Air(M1, 2020)上でRuby/Tkを使ってPlotchart
久しぶりの更新。
はじめに
MacBook Air(M1, 2020)を手に入れたので、Ruby/Tkを使ってPlotchartできるようにします。
Homebrewのインストール
なにはともあれHomebrewをインストールします。詳細は割愛します。
Rubyのインストール
$ brew install ruby
tcl-tkのインストール
$ brew install tcl-tk
tklibのインストール
ここからtklibのソースをダウンロードします。現時点でtklib-0.6.tar.bz2から7年ぶり2020年2月にリリースされた
tklib-0.7.tar.bz2が最新のようです(ここのブログも5年ぶりの更新ですが)。
ともかく、展開してインストールします。
$ tar xvf tklib-0.7.tar.bz2
$ cd tklib-0.7
$ PATH="$(brew --prefix tcl-tk)/bin:$PATH" \
 ./configure --prefix=$(brew --prefix tcl-tk)
$ make install
gemのインストール
Ruby本体から分離されてgemになっているRuby/Tkをインストールします。
$ PATH="$(brew --prefix tcl-tk)/bin:$PATH" \
gem install tk
動作確認
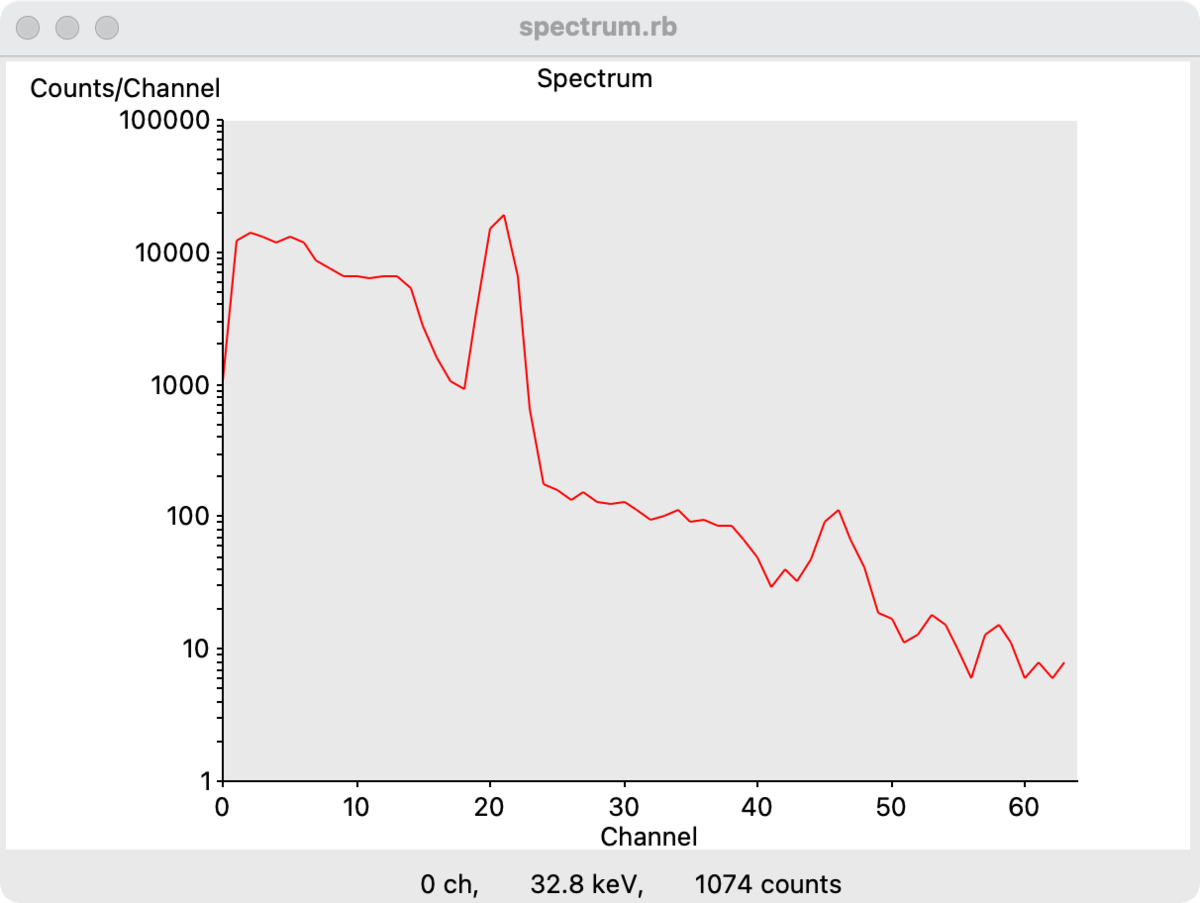
問題なく動作しました。
MDArrayを試してみました
はじめに
「NArrayっぽいやつをいろいろ試しました - ござるのブログ」に続いて、JRubyのMDArrayも試してみました。
実行環境は以下の通りです。
- MacBook Pro (Late 2013)
- OS X El Capitan 10.11.5
- rbenvで入れたJRuby 9.1.2.0
MDArray 0.6.1.2
MDArray は、JRuby用の多次元配列です。NumPyや旧NArray にinspireされたものだそうです。
require 'mdarray'
require 'benchmark'

SIZE = 16384

Benchmark.bmbm do |x|
  x.report do
    r = Random.new
    a = MDArray.fromfunction('double', [SIZE, SIZE]) { r.rand }
    b = MDArray.fromfunction('double', [SIZE, SIZE]) { r.rand }
    c = a * b
  end
end
実行結果
Error: Your application used more memory than the safety cap of 500M.
メモリが足りないと言われました。-J-Xmx12Gというオプションを付けて再実行します。
       user     system      total        real
  71.180000   3.840000  75.020000 ( 73.881698)
おわりに
やはり乱数を生成してセットするところが遅いようです。
NArrayっぽいやつをいろいろ試しました
はじめに
「MF / Numo::NArray を試してみる」を拝見し、NumRu::NArrayもあると思ったので試してみました。ほぼ真似です。すみません。
実行環境は以下の通りです。
- MacBook Pro (Late 2013)
- OS X El Capitan 10.11.5
- rbenvで入れたRuby 2.3.1
NArray 0.6.1.2
他のNArrayっぽいやつに多大な影響を与えたと思われる旧バージョンです。これのおかげで、いろんなデータ解析が捗りました。作者様ありがとうございます。
require 'narray'
require 'benchmark'

SIZE = 16384

Benchmark.bmbm do |x|
  x.report do
    a = NArray.float(SIZE, SIZE).random
    b = NArray.float(SIZE, SIZE).random
    c = a * b
  end
end
実行結果
 benchmark_narray.rb:10:in `float': allocation size is too large (ArgumentError)
    from benchmark_narray.rb:10:in `block (2 levels) in <main>'
旧NArrayではこんなに大きいサイズは扱えないようです。
NumRu::NArray 1.0.3
NumRu::NArrayはNArrayにbig memory supportを加えたものだそうです。
require 'numru/narray'
require 'benchmark'

# ENV['OMP_NUM_THREADS'] = '4'

include NumRu

SIZE = 16384

Benchmark.bmbm do |x|
  x.report do
    a = NArray.float(SIZE, SIZE).random
    b = NArray.float(SIZE, SIZE).random
    c = a * b
  end
end
実行結果
       user     system      total        real
   9.370000   7.030000  16.400000 ( 20.239738)
NArrayではエラーになったサイズの計算ができました。
Numo::NArray 0.9.0.1
Numo::NArrayは、期待の新NArrayです。GSLとのインタフェースもあるようです。すばらしいです。
require 'numo/narray'
require 'benchmark'

include Numo

SIZE = 16384

Benchmark.bmbm do |x|
  x.report do
    a = DFloat.new(SIZE, SIZE).rand
    b = DFloat.new(SIZE, SIZE).rand
    c = a * b
  end
end
実行結果
       user     system      total        real
   7.840000   2.570000  10.410000 ( 12.739366)
おお、NumRu::NArrayより速い。
NMatrix 0.2.1
NMatrixは、Rubyでscientific computingをやろうというSciRubyのfast numerical linear algebra libraryです。以前はNArrayと同時にはインストールできなかったのですが、require 'nmatrix/nmatrix'とすれば使えるようになったようです。
require 'nmatrix/nmatrix'
require 'benchmark'

SIZE = 16384

Benchmark.bmbm do |x|
  x.report do
    a = NMatrix.random([SIZE, SIZE])
    b = NMatrix.random([SIZE, SIZE])
    c = a * b
  end
end
実行結果
       user     system      total        real
 129.120000   6.300000 135.420000 (137.681446)
遅いです。
GSL::Matrix 1.16.0.6
GSL::Matrixは、GSLのRubyバインディングで使えます。
require 'gsl'
require 'benchmark'

include GSL

SIZE = 16384

Benchmark.bmbm do |x|
  x.report do
    r = Rng.alloc
    a = Matrix.alloc(SIZE, SIZE).map { r.uniform }
    b = Matrix.alloc(SIZE, SIZE).map { r.uniform }
    c = a.mul_elements(b)
  end
end
実行結果
       user     system      total        real
  54.000000   6.220000  60.220000 ( 62.904272)
このコードでは乱数を生成してセットする部分にワンクッションあるのでどうしても遅くなります。でも、NMatrixよりは速いです。
まとめ
今回は、Numo::NArrayが最も速いという結果になりました。